The GDLink Toolset
GDLink gives you a visual logic workspace inside Godot so you can connect game behavior without writing the same scripts by hand every time. This page introduces the main parts of that workspace before you start building full gameplay graphs.
GDLink workspace
The GDLink workspace is where you add, arrange, and connect logic nodes for the selected scene or object. Use it as the planning surface for a behavior: start with the event that should happen, add any conditions that should filter it, then connect the action that should run.
Keep early graphs small and readable. A clear workspace is easier to debug than a heroic spaghetti ritual. Godot already has enough ways to humble us.
Variables
Variables store values that your graph can read or change while the project runs.
Global variables are shared across the project. Use them for values that multiple scenes or systems need, such as player score, selected difficulty, inventory counts, or persistent flags.
Local variables belong to a more specific object, graph, or scene context. Use them for values that only matter to that part of the project, such as a door’s open state, a temporary timer, or one enemy’s patrol mode.
Choose the narrowest variable scope that still solves the problem. If only one object needs the value, local is usually cleaner.
States
States organize behavior into modes such as idle, moving, attacking, interacting, paused, or menu open. A state-aware setup lets the same object react differently depending on what it is currently doing.
Use states when a behavior has clear modes. For example, a character might listen for movement input in a gameplay state, but ignore that input while a menu state is active.
Node flow
Most GDLink logic follows a simple flow:
Listener detects something: input, time, collision, scene start, or another event.
Gate checks whether the branch should continue.
Executor performs the action: move an object, write a variable, update UI, play audio, change state, or trigger another gameplay result.
Gates are the decision point. AND waits for every connected condition, OR passes when any connected condition is true, XOR passes when exactly one input is true, and the NAND/NOR variants invert those decisions. Use them to make the graph say the rule out loud: “only jump when input is pressed and grounded,” or “open this door when either switch is active.”
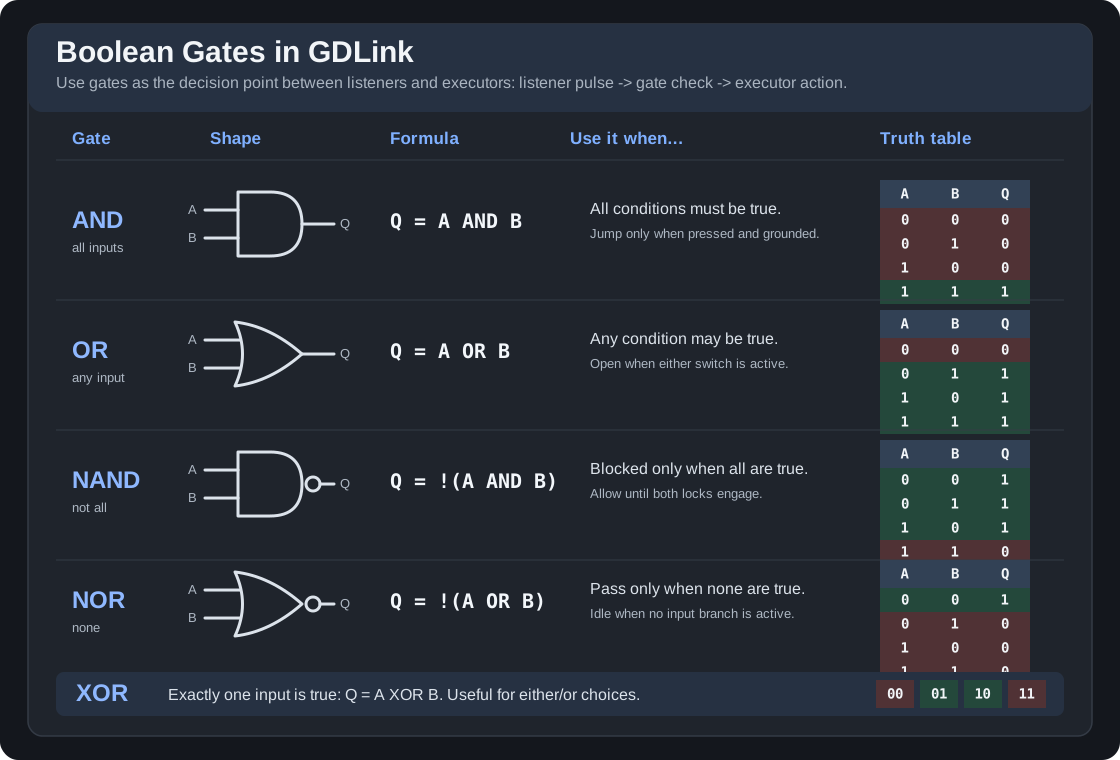
A simple proof graph is:
Delay Listener -> AND Gate -> Print Executor
That confirms the graph is firing before you add motion, UI, variables, or state changes.
Editor quality-of-life tools
These tools are worth learning early because they keep graphs readable while you iterate:
Shift+Aopens the add-brick menu from the canvas.Vopens local Variables for the selected graph.Built-in brick colors separate listeners, gates, and executors at a glance. To add your own color coding, select one or more logic bricks, right-click the selection, choose Apply Color…, pick a color, and confirm. The color is saved with the graph and works with undo.
State frames can be color coded the same way: select or right-click the state frame, choose Apply Color…, pick a color, and confirm. Use consistent colors for major modes such as gameplay, menu, paused, combat, or dialogue.
Brick labels and the logic rename button let branches describe intent directly in the graph. Type in a brick’s name field to label that brick, and use the toolbar Rename button to rename the GDLink runtime node for the selected object.
Right-click a state frame and choose Rename State to name that state in place. In the State Panel, right-click a state button to make it the active editing state.
Copy and paste work on selected bricks. Copied bricks are stored as JSON on the clipboard, so you can send that JSON to another GDLink user and they can paste the same bricks into their graph.
Undo and redo are available for normal graph editing, so you can test layout and wiring changes without committing to them immediately.
First toolset checklist
When you start a new GDLink behavior, identify these pieces first:
Where does this behavior live? Pick the scene or object that should own the graph.
What starts it? Choose the listener.
What conditions matter? Add gates only where they make the behavior clearer.
What changes? Choose the executor and any variables it reads or writes.
Does mode matter? Add states when the behavior should change between gameplay modes.
How will you prove it works? Start with visible output, a print message, or a simple scene test.
Once those pieces are clear, the graph becomes a toolset instead of a guessing game.